Spooky Eyes Lantern: Crafting Eerie Charm Without the Frustration
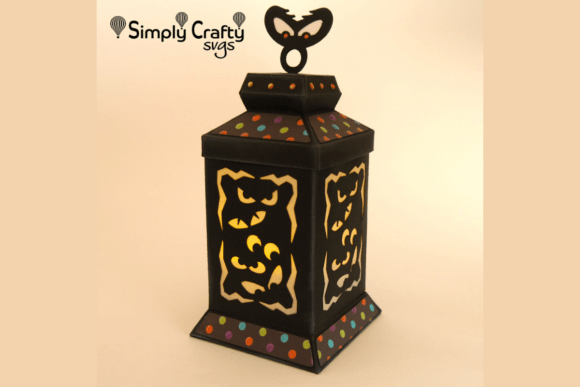
Halloween decor often falls into two camps: the mass-produced plastic that lacks soul, or the high-end artisan pieces that drain your wallet. The Spooky Eyes Lantern sits perfectly in the sweet spot between these extremes. It offers a touch of eerie charm to your seasonal display, featuring a cutout design of glowing monster eyes peering from the darkness. Whether you are aiming for haunted house vibes or a festive party centerpiece, this 3D paper lantern delivers impact without requiring advanced engineering skills. However, many crafters rush into cutting files without understanding the nuances of paper weight, light diffusion, and structural integrity, leading to disappointing results.
Understanding the Appeal and Functionality
The core appeal of the Spooky Eyes Lantern lies in its interactive element. By inserting a battery-operated tealight, the eyes shine with an unsettling glow, transforming a simple paper structure into a dynamic decoration. During the day, it serves as a creepy-cute accent; at night, it becomes a focal point. This versatility makes it an excellent project for Cricut and Silhouette users alike. Yet, the difference between a professional-looking finish and a sloppy craft often comes down to material selection and assembly precision.
Many beginners assume that any cardstock will suffice. This is a common misconception that can compromise the final product. The finished size of this lantern is approximately 3.75” x 3.75” x 6.5”, excluding the top embellishment. Because of these dimensions, the structural demands on the paper are specific. Using paper that is too thin will result in a lantern that collapses under its own weight or warps when glue is applied. Conversely, paper that is too thick may not fold cleanly, creating bulky seams that ruin the sleek silhouette of the design.
Common Material Mistakes and How to Avoid Them
One of the most frequent errors involves the choice of cardstock. For the lantern base and spooky eye panels, standard copy paper is entirely inadequate. You need a sturdy medium that holds its shape. A recommended approach is using two 12” x 12” sheets of textured cardstock, such as American Crafts AC Textured Cardstock. This specific weight provides the necessary rigidity while still allowing for crisp folds. If you attempt to use smaller paper scraps for the main body, you may find yourself piecing together unsightly seams that distract from the glowing eyes.
Another overlooked detail is the inner panel material. The design relies on light diffusion to create the "glowing" effect. If you use opaque cardstock behind the eye cutouts, the light will be blocked entirely, leaving dark holes rather than eerie glows. On the other hand, using standard printer paper might be too translucent, revealing the internal structure of the lantern and breaking the illusion. The solution is vellum. Including a single 8.5” x 11” vellum sheet for the inner panels ensures that the light from the tealight is softened and distributed evenly. This creates a haunting, ethereal shine rather than a harsh beam.
Assembly Pitfalls That Ruin the Illusion
Even with the right materials, assembly technique plays a critical role. Many crafters skip the step-by-step guidance, assuming the project is intuitive. While the Spooky Eyes Lantern is designed to be user-friendly, ignoring the tutorial can lead to misaligned panels. When the eye panels are not perfectly aligned with the outer cutouts, the glowing effect is uneven, and the monster looks cross-eyed rather than menacing. It is highly advisable to follow the included video tutorial, which mirrors the assembly process of similar projects like the Spider Web Lantern. Watching the process once can save you from having to dismantle and re-glue delicate paper sections.
Adhesives are another area where mistakes happen. Liquid glue can warp thin cardstock if applied too generously. Foam tape is often a better choice for attaching the base and top rings, as it adds structural depth and prevents the paper from buckling. However, ensure the foam tape is narrow enough to remain hidden within the seams. Visible adhesive residues or bulky tape edges can detract from the clean lines of the lantern.
Enhancing the Design with Optional Details
Once the basic structure is sound, you can elevate the presentation with optional embellishments. Some crafters add chalk ink to the edges of the cutouts to create a weathered, aged look. This subtle shading adds depth and makes the lantern appear as if it has been sitting in a dusty attic for decades. Additionally, using crystal drops or similar gems to mimic dewdrops or tears on the lantern surface can catch the light in interesting ways. These details are not strictly necessary, but they transform a good craft into a great one.
It is also important to consider the light source. Not all battery-operated tealights are created equal. Some emit a cool white light, which can feel clinical rather than spooky. For the best effect, choose a tealight with a warm, flickering amber hue. This mimics the glow of a candle and enhances the organic, living feel of the monster eyes. Ensure the tealight fits securely at the base so it does not tip over, which could pose a fire hazard if real candles were ever mistakenly used, though battery-operated options are strongly recommended for safety.
Final Checks Before Display
Before placing your Spooky Eyes Lantern on display, perform a few quality checks. First, verify that all folds are sharp and creased properly. Soft folds can cause the lantern to lean or twist. Second, check the alignment of the vellum behind the eyes. It should be taut and free of wrinkles, as creases in the vellum can distort the light pattern. Finally, test the lantern in both daylight and darkness. In the day, ensure the cutouts are clean and free of stray paper fibers. At night, confirm that the light diffusion is even and that no internal glue spots are casting unwanted shadows.
By paying attention to these details, you avoid the common pitfalls that plague DIY Halloween decor. The Spooky Eyes Lantern SVG File is designed to be accessible, but accessibility does not mean carelessness. Taking the time to select the right cardstock, use vellum for diffusion, and follow the assembly tutorial ensures a professional result. This project is not just about cutting paper; it is about creating an atmosphere. When done correctly, the lantern becomes more than a decoration—it becomes a conversation piece that adds genuine character to your Halloween celebrations.
Whether you are a seasoned crafter looking for a quick project or a beginner wanting to try 3D paper crafting, this lantern offers a rewarding experience. The key is to respect the materials and the process. Avoid the temptation to rush, and do not underestimate the importance of light diffusion. With the right approach, you will create a piece that is both frightful and delightful, perfectly capturing the spirit of the season.