Elevate Designs with Chrome Object Overlays
In the fast-paced world of digital design, capturing attention requires more than just good typography and balanced layouts. It demands texture, depth, and a sense of tangible reality. This is where the Chrome Object Overlay becomes an indispensable tool for creators. Whether you are designing a poster for an upcoming music festival, crafting a sleek cover for a tech magazine, or building a brand identity for a futuristic startup, metallic elements add a layer of sophistication that flat graphics simply cannot achieve.
The concept is straightforward yet powerful. A Chrome Object Overlay consists of high-resolution renders of three-dimensional shapes made to look like polished metal. These are not generic clip art; they are carefully crafted digital assets that mimic the way light interacts with reflective surfaces. By integrating these elements into your work, you introduce a bold, industrial aesthetic that feels both modern and premium.
Understanding the Visual Impact
Why do designers gravitate toward metallic textures? The answer lies in human psychology and visual perception. We associate chrome and polished steel with precision, technology, and luxury. When you place a coiled spring or an interlinked ring made of virtual chrome onto a canvas, it immediately signals quality. The reflections suggest a light source, giving the two-dimensional screen a hint of three-dimensional space.
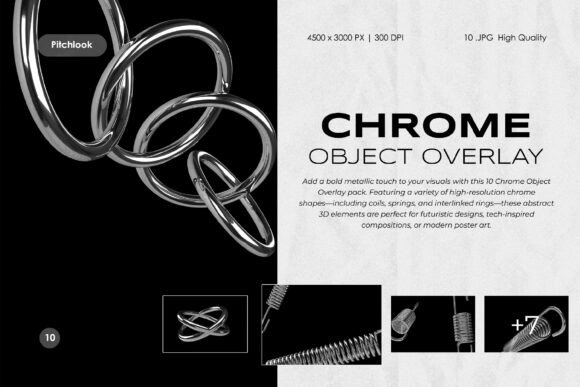
The Chrome Object Overlay — 3D Metallic Abstract Elements pack takes this principle and refines it. It features ten distinct high-resolution JPG renders. These include complex forms like tangled loops and smooth, coiled springs. Each shape is designed to be versatile. They are abstract enough to fit various contexts but detailed enough to serve as focal points. The high-fidelity 3D renders capture dynamic lighting and polished reflections, ensuring that the objects look realistic rather than cartoonish.
Practical Applications for Creators
One of the greatest strengths of this asset pack is its versatility. You do not need to be a senior art director to find uses for these overlays. Here are several practical ways to integrate them into your workflow:
- Poster and Cover Art: Music albums and event posters often rely on striking visuals to stand out in crowded feeds. A large, chrome loop placed strategically over a photograph can create an immediate focal point, drawing the viewer’s eye to the center of the composition.
- Futuristic and Industrial Designs: If you are working on branding for a tech company, automotive blog, or engineering firm, these elements reinforce the theme. They communicate strength and innovation without needing words.
- Digital Collage and Editorial Layouts: Magazine spreads and online articles benefit from break-out elements. Instead of using standard dividers, try using a small chrome ring to separate sections of text. It adds a subtle touch of elegance.
- Tech-Inspired Branding: Logos and social media headers can feel stale if they remain static. Incorporating a metallic abstract shape can give a brand a fresh, forward-thinking look.
Technical Specifications and Quality
For professionals, the technical details matter just as much as the aesthetic appeal. Low-resolution images pixelate when scaled, ruining the illusion of realism. This pack addresses that concern by providing files with dimensions of 4500 x 3000 pixels. At a resolution of 300 DPI, these images are print-ready. This means you can use them for physical merchandise, such as t-shirts, brochures, or large-format prints, without worrying about quality loss.
The file format is JPG, which is universally compatible with almost every design software. However, the key feature here is the background. Each object is isolated on a black background. This is not a limitation; it is a deliberate design choice that simplifies the editing process. Black backgrounds allow for easy cutouts or seamless overlay integration using blending modes.
How to Blend Like a Pro
If you are new to using overlays, the process might seem intimidating, but it is actually quite simple. You do not need advanced masking skills to get started. The secret lies in understanding blending modes in software like Adobe Photoshop or After Effects.
When you place a chrome object with a black background over your design, the black area will initially cover your artwork. To fix this, change the layer’s blending mode. Here are the most effective options:
- Screen: This mode looks at the color information in each channel and multiplies the inverse of the blend and base colors. The resulting color is always lighter. It effectively makes the black background disappear, leaving only the bright, reflective parts of the chrome.
- Lighten: This compares the base and blend colors and keeps whichever is lighter. It is useful if you want to preserve some of the darker tones in the reflection while still removing the pure black background.
- Linear Dodge (Add): This creates a brighter result than Screen. It is ideal when you want the chrome to look like it is emitting light or has intense highlights.
By experimenting with these modes, you can make the metallic objects appear as if they are physically sitting on top of your background image, reflecting its colors and lights. This integration is what separates amateur designs from professional compositions.
Considerations Before You Start
While these overlays are powerful, they should be used with intention. Overusing metallic elements can clutter a design and distract from the main message. Think of the Chrome Object Overlay as a spice rather than the main ingredient. One or two well-placed elements are often more effective than a chaotic scatter of shapes.
Additionally, consider the color palette of your project. Chrome reflects its environment. If your background is warm-toned, the chrome will pick up those hues. If your background is cool and blue, the metal will appear colder. This interaction can be used creatively to unify the color scheme of your piece. Always check how the reflections interact with any text you have placed nearby. Ensure that the shiny highlights do not make the text difficult to read.
Finally, remember that these are static JPGs. While they are high-quality, they are not 3D models that you can rotate. You must choose the angle that best fits your composition from the ten provided options. Plan your layout before dragging the files in to ensure the perspective of the chrome object matches the perspective of your other elements.
Adding a bold metallic touch to your visuals does not require expensive 3D rendering software or hours of modeling time. With a premium pack like this, you gain instant access to professional-grade assets that elevate your work. Whether you are a beginner looking to experiment with new styles or a seasoned pro needing quick, high-quality elements, these chrome objects offer a efficient solution for modern design needs.